
Curing House
a) Launching
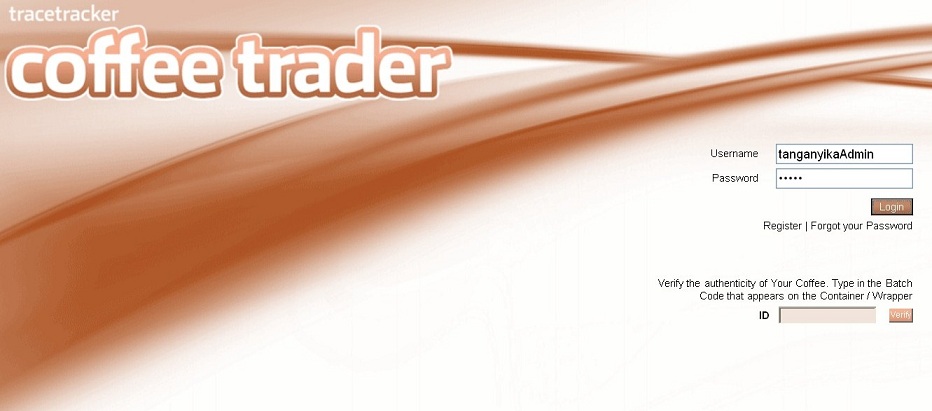
Open Mozilla-Firefox and type “https://demo-ct.tracetracker.com/”.
b) Login
i) Enter your username and password then click on Login.
ii) Click on cancel it clears the username and password fields/text boxes.
c) Process
The process section is the transactions section. At the curing house, these transactions are receive coffee, curing instructions, curing results, quality certification, bulking instruction, storage warranty and coffee disposal.
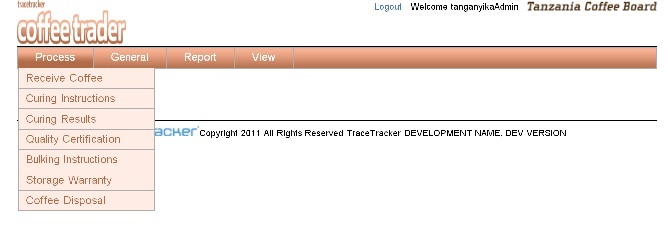
i) The menus are located on the top; they assist the users to navigate through the application.
ii) Menus arranged under
a. Process
b. General
c. Reports
d. Views
i. Receive coffee
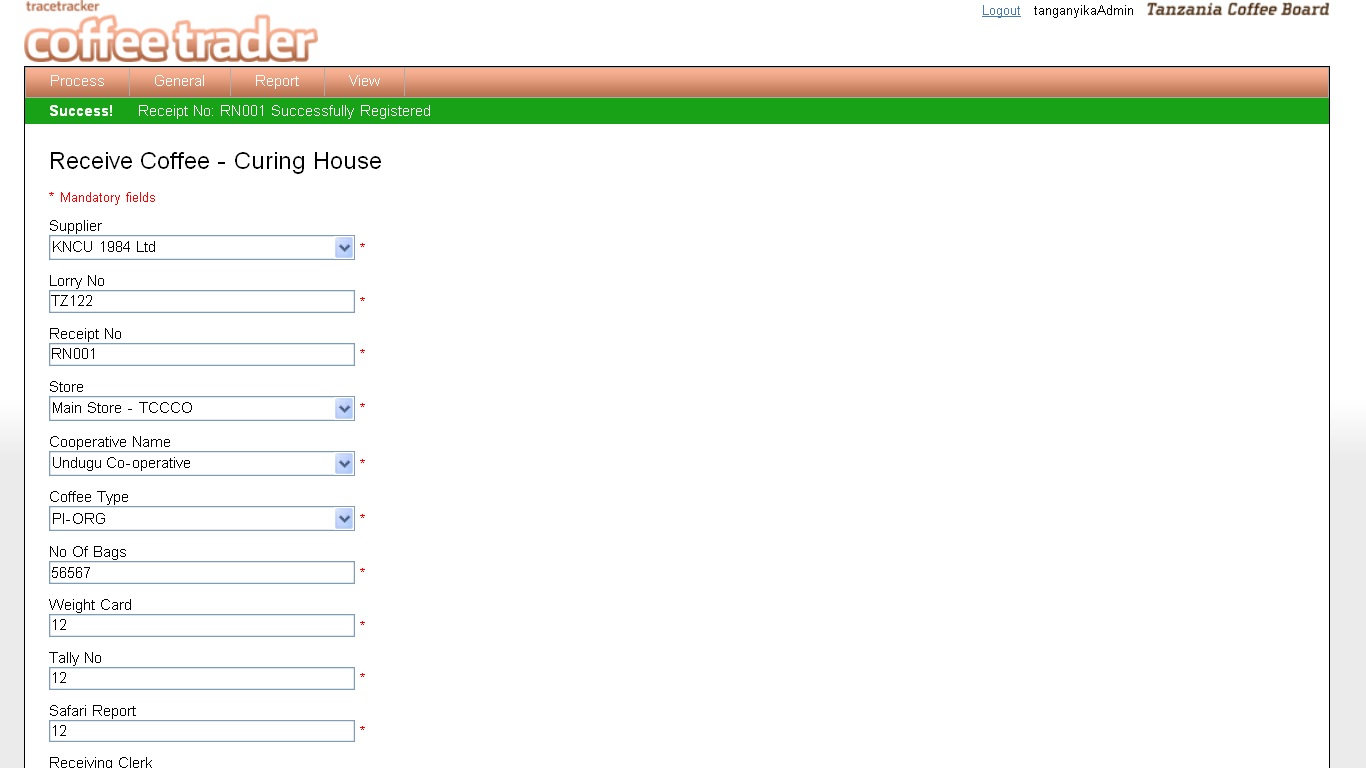
Receive Coffee is the first process. Coffee from various suppliers (Co-operative societies, Private Exporters, Farmer groups) is received by the curing houses for curing. The curing house user fills in the details below about the coffee that they are receiving.
i. Coffee Registration
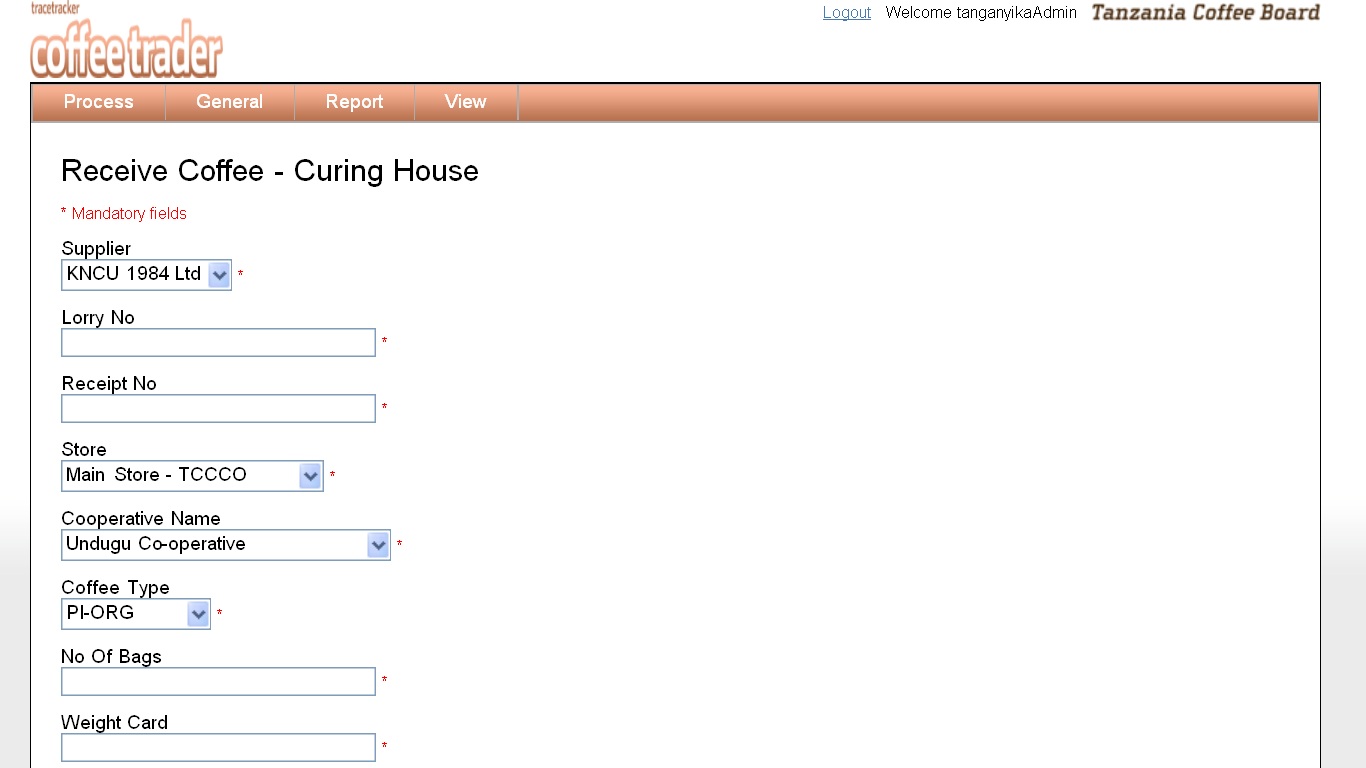
i. On the “Process menu” click on Receive coffee.
- The above form will be loaded –this is where the curing house will enter all the details about the coffee they are receiving.
- Select the “supplier name”.
- Enter the “lorry number”.
- Enter the “receipt number”.
- Select the “store”.
- The select the name of the “cooperative name”.
- Select the “coffee type”.
- Enter the “number of bags”.
- Enter the “weight card”.
- Enter the “tally number”.
- Enter the “safari report”.
- Enter the “receiving clerk”.
- Enter the “lorry full” until he/she completes the form.
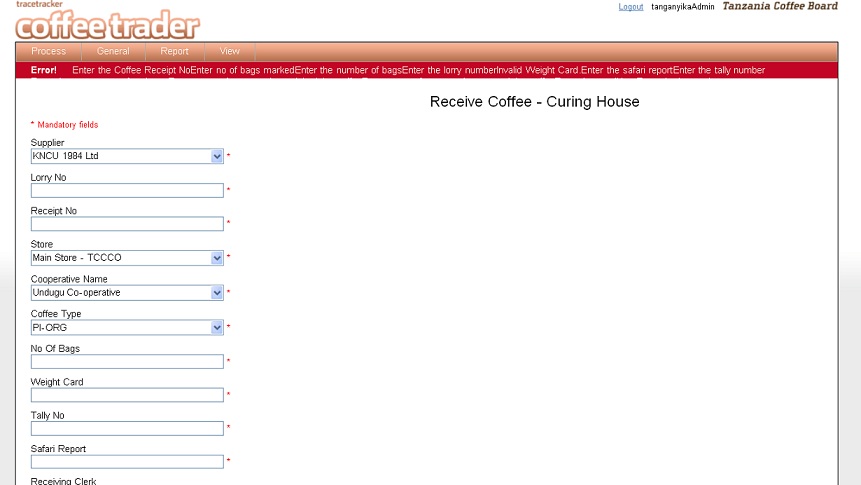
- When all the fields have been entered click on “Receive Coffee”, if the data has been wrongly entered you will get an error message as shown below.
Validation on input.
- “Supplier Number” will accept only text values.
- “Lorry Number” will accept only alpha numeric values.
- “Receipt Number” will accept numeric values.
- “Number of bags” will accept numeric values.
- “Weight Card” will accept alphanumeric values.
- “Tally number” will accept numeric values.
- “Safari report” will accept alphanumeric values.
- “Receiving clerk” will accept text values.
- “Lorry full” will accept numeric values.
- “Moisture Content” will accept numeric values.
- “Load” will accept numeric values.
- “Counted by” will accept text values.
- “Less bag weight” will accept numeric values.
- “Condition” will accept numeric values.
- “Nett weight” will accept numeric values.
- “Instruction” will accept alphanumeric values.
- “Comments” will accept numeric values.
- “Bags marked” will accept numeric values.
If wrong input is entered an error message is loaded on the screen.
Error message
Success message
Curing instructions
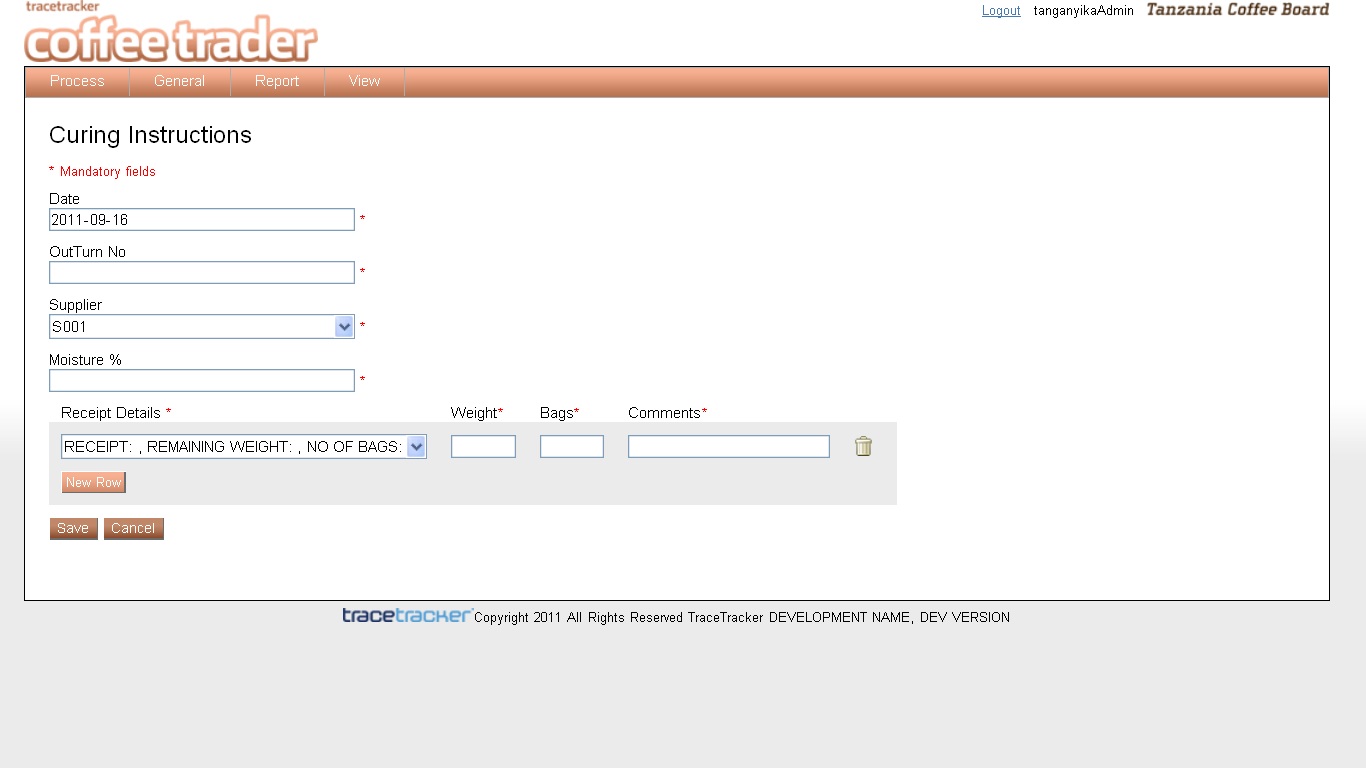
Curing instructions is where, various coffee deliveries from one supplier are cured as one batch.
Curing Instructions
- On the ”Process menu” click on curing Instructions
- Select the “Date” by clicking inside the Date field. The default date displayed is of the current date.
- Enter the “Outturn number”.
- Select the “Supplier Name”.
- Enter the “moisture %”.
- On the receipt details, select the “receipt number, enter the weight, bags and comments / remarks”.
- If you want to attach more receipts to an outturn number, click on “new row”.
- When done click on the “Save” button.
- Click on “Cancel” when you want to the clear the form.
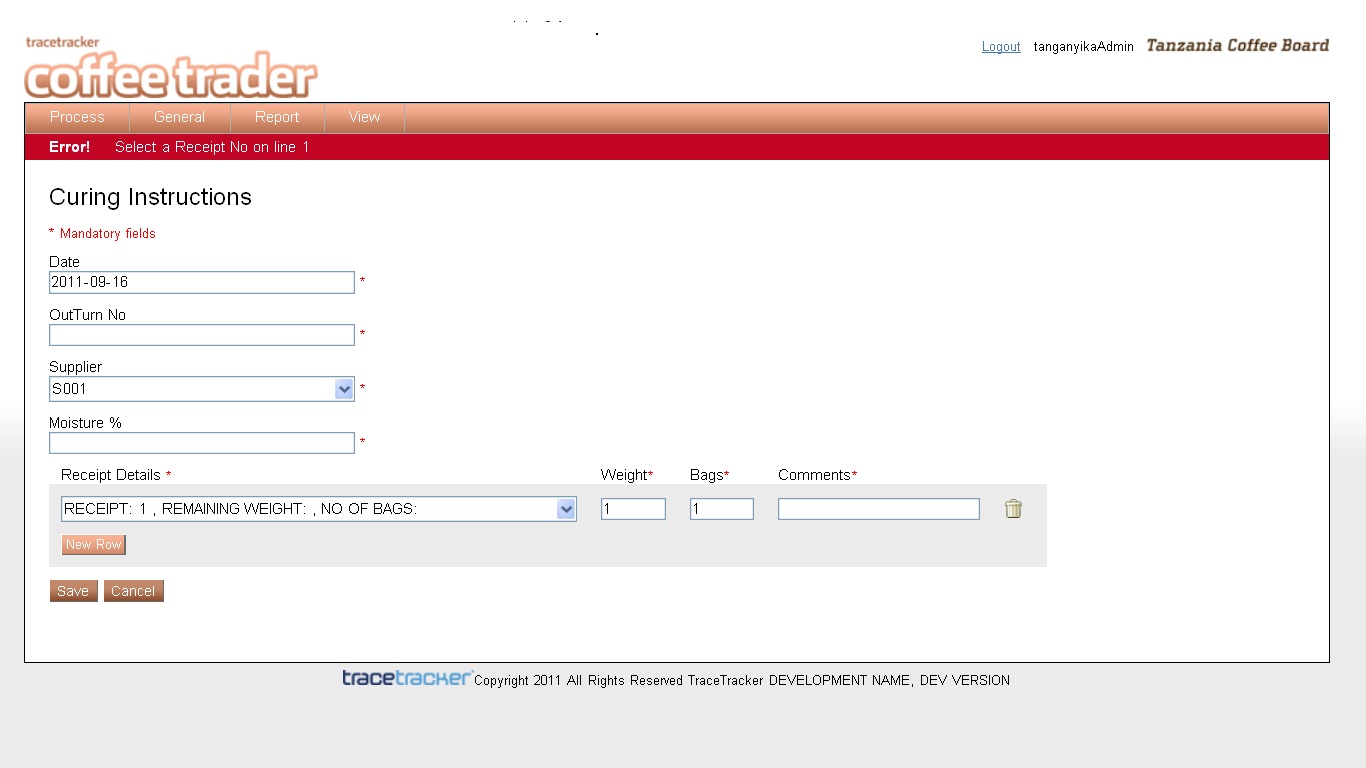
- If the data has been correctly or incorrectly entered you will get a message as shown below.
Validation on input.
- “Date” will accept only date format values e.g. 2011-09-14.
- “Outturn Number” will accept only alpha numeric values.
- “Supplier Number” will accept text values.
- “Moisture Content” will accept numeric values.
- “Weight” will accept numeric values.
- “Bags” will accept numeric values.
- “Comments” will alphanumeric values.
If wrong input is entered an error message is loaded on the screen.
Error message
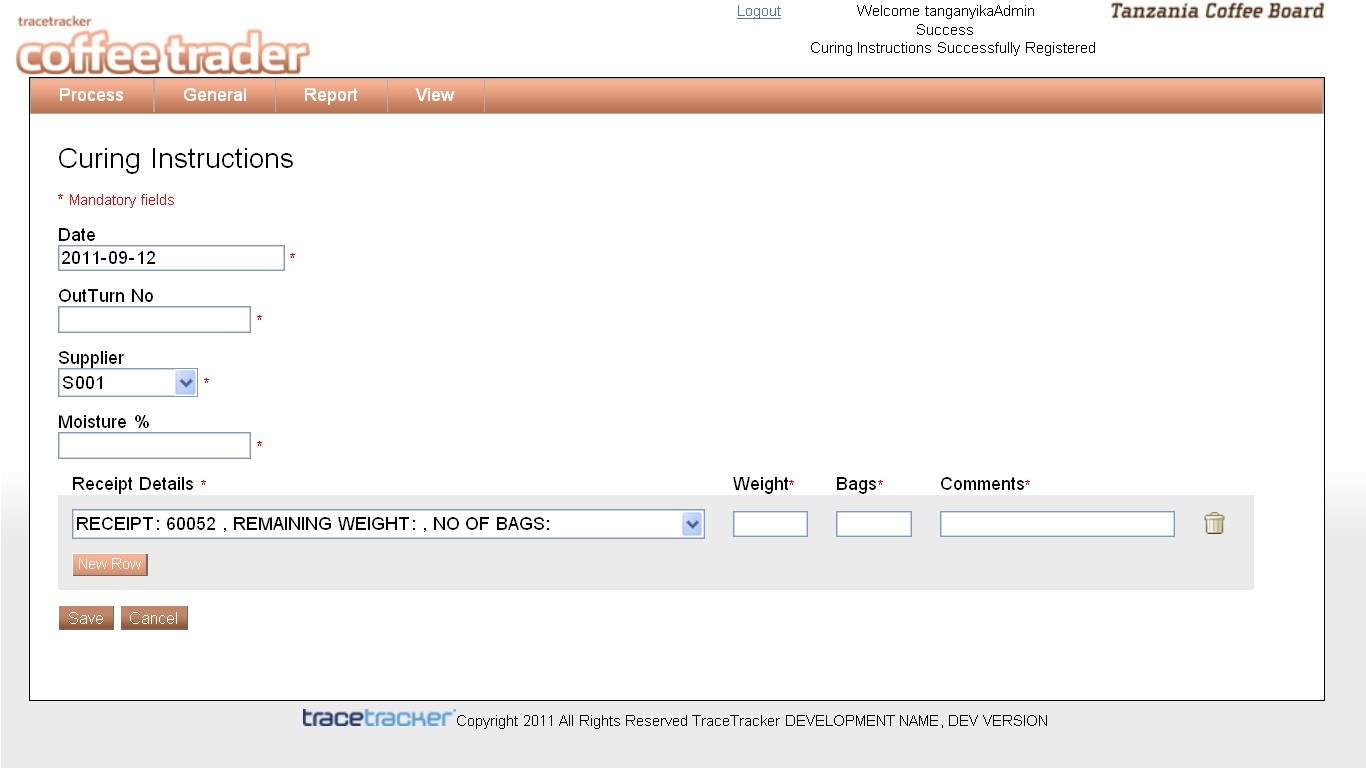
Success Message
Curing results
Curing results, results in the grades of the cured coffee got from the cured process.
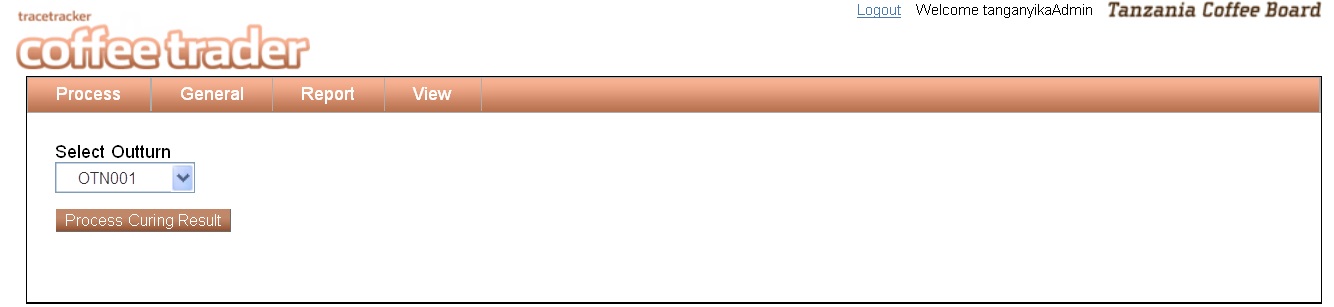
- On the Process menu click on “curing results”.
- Select the “Outturn number “from the drop down.
- When done click on the “Process Curing Results” button.
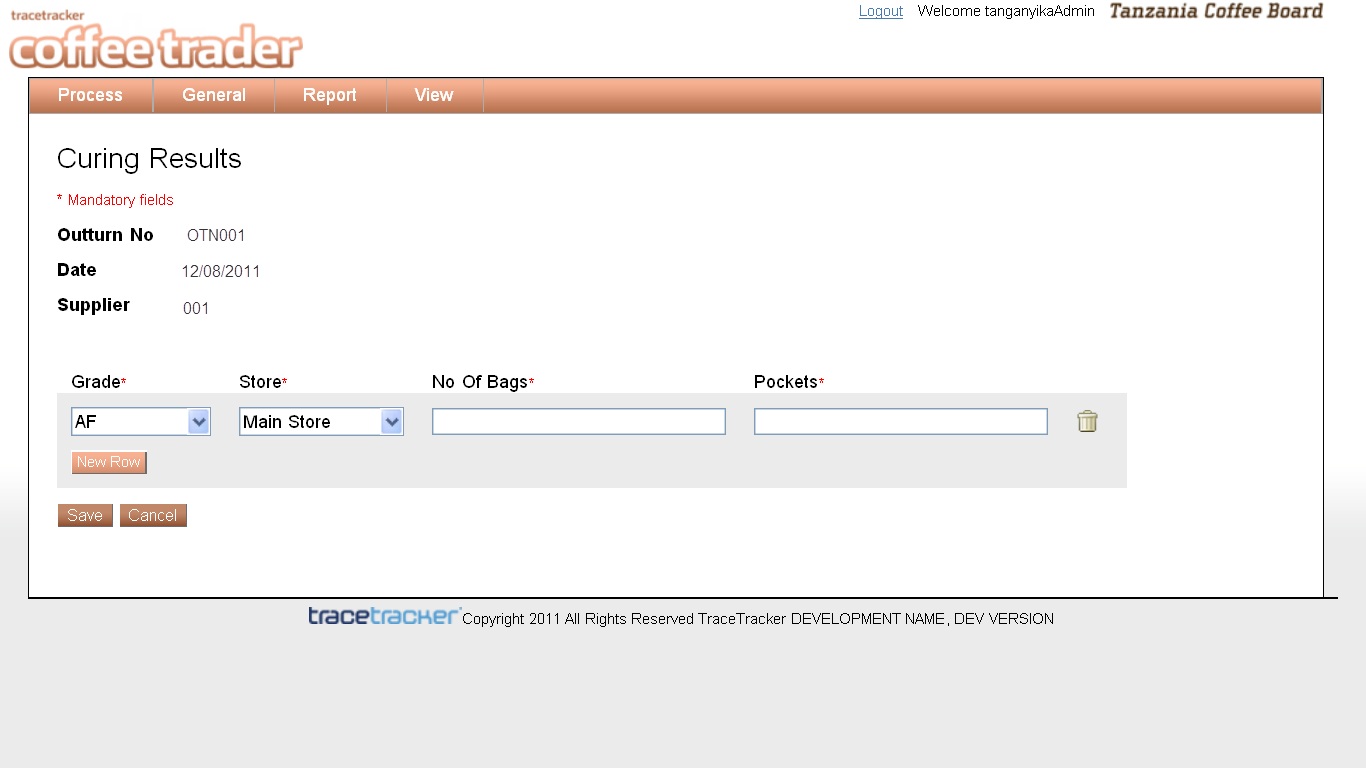
- The below screen is loaded
- Select the “Grade”.
- Select the “store”
- Enter “No. of bags”.
- Enter “Pocket”.
- If you want to add more click on “new row”.
- When done click on the “save” button.
- Click on “Cancel” when you want to the clear the form.
- If the data has been correctly or incorrectly entered you will get a success message if its not filled in correctly you get an error message.
Validation on input.
- “Number of Bags” will accept numeric values.
- “Pockets” will accept numeric values.
If wrong input is entered an error message is loaded on the screen.
Quality certification
Quality certification facilitates in recording classification results
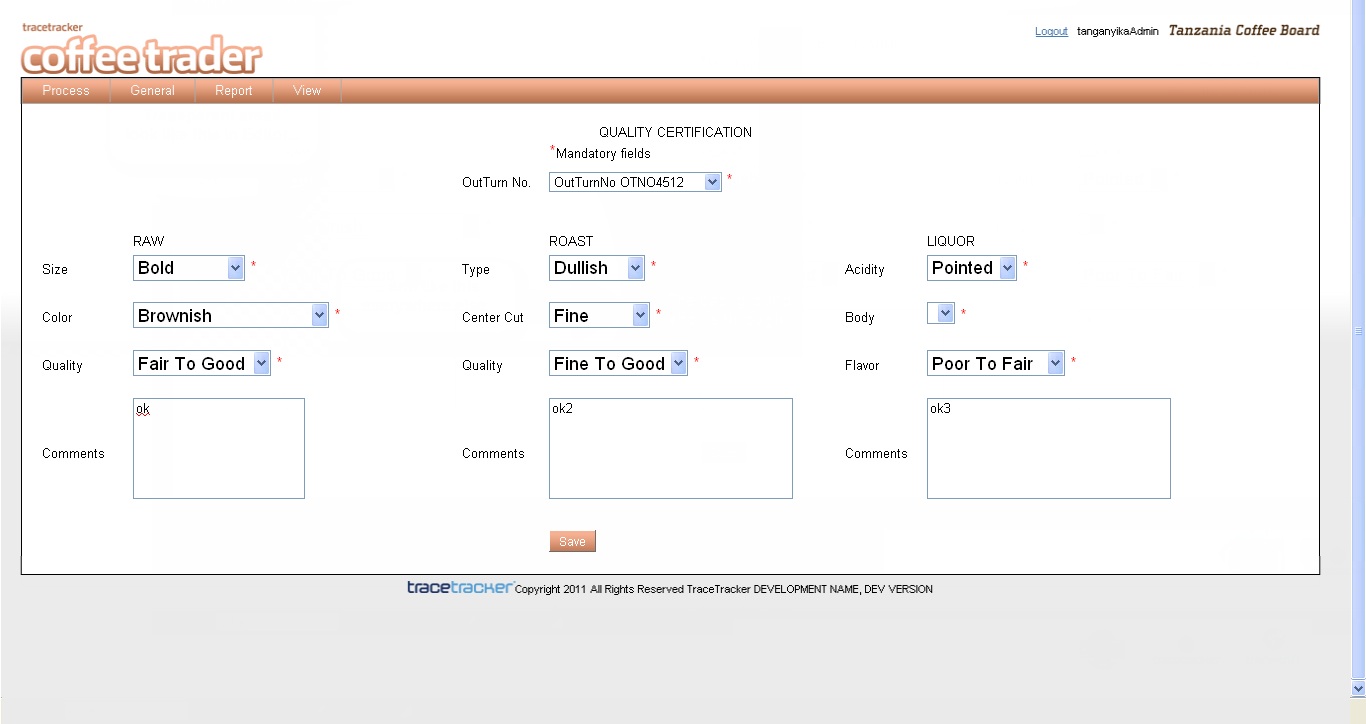
- Select the outturn Number.
- Under RAW:
- Select “Size”.
- Select “color”.
- Select “Quality”
- Enter the “Comments"
- Under ROAST;
- Select “Type"
- Select “Center cut”.
- Select “Quality”.
- Enter the “Comments”.
- Under LIQOUR
- Select the “Type”.
- Select the “body”.
- Select the “flavour”.
- Enter the “Comments”.
- When done click on the “save” button.
- If the data has been correctly or incorrectly entered you will get a message as shown below.
Validation on input.
- “Comments” on raw will accept alphanumeric values.
- “Comments” on roast will accept alphanumeric values.
- “Comments” on liquor will accept alpha numeric values.
If wrong input is entered an error message is loaded on the screen.
Bulking instructions
Samples of curing results (grades) are analyzed for quality and are given different classifications. This process is called Liquoring and can be done at Tanzania Coffee Board (TCB) or at the curing house. TCB certified liquorers do the quality analysis and issue a document known as Bulking Instructions. This document basically is a request or an instruction to bulk the cured coffee in readiness for auction sale or direct export.
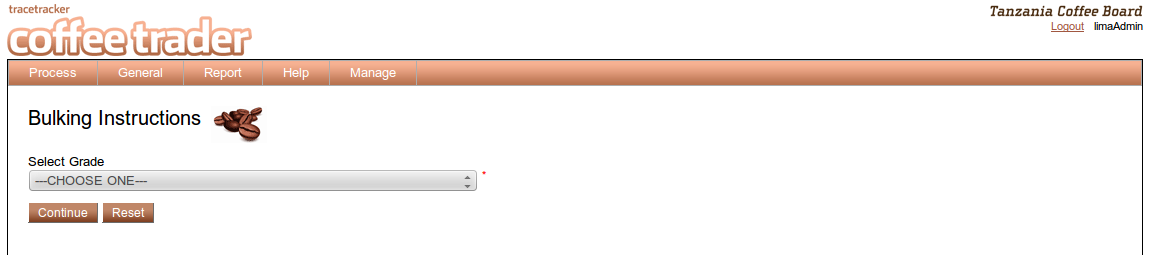
- Select "Grade" from the drop down and click "Continue"
- The page shown below loads already filled with the grade selected.
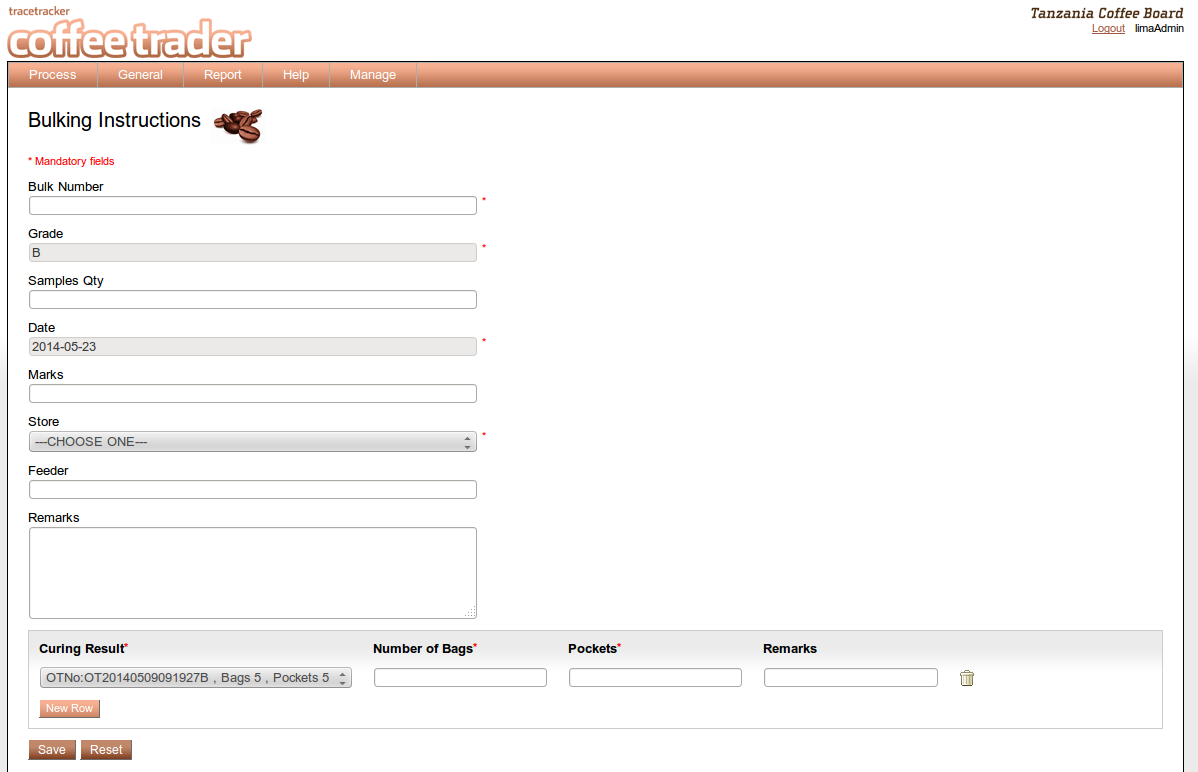
- Enter the “bulk number”.
- The Grade selected on the previous page is displayed.
- Select the “Date”.
- Enter the “Marks”
- Select the “Store”.
- Enter the “feeder”.
- Enter the “Remarks”.
- Under curing result, select the “curing result”, enter the “number of bags”, “pockets” and “remarks”.
- If you want to add more click on “new row”.
- When done click on the “save” button.
- Click on “Cancel” when you want to the clear the form.
- If the data has been correctly or incorrectly entered you will get a message as shown below.
Validation on input.
- “Bulk Number” will accept only alpha numeric values.
- “Date” will accept only date format values e.g. 2011-09-14.
- “Marks” will accept text values.
- “Feeder” will accept text values.
- “Remarks” will accept alphanumeric values.
- “Number of bags” will accept only numeric values.
- “Pockets” will accept only numeric values.
- “Remarks” will accept only alphanumeric values.
If wrong input is entered an error message is loaded on the screen.
Bulking instructions
- On the Process menu click on “Bulking Instructions”.
- Enter the “Bulk Number”.
- Select the “Grade” from the drop down menu.
- Select the date by clicking inside the Date field. The default date displayed is of the present day
- Enter the “marks”.
- Select the “Store”.
- Enter the “feeder”.
- Enter the “remarks”.
- In the curing results, select the curing results, from the drop down, enter the “No. of Bags”, “Pockets” and “Remarks”.
- If you want to add more click on “new row”.
- When done click on the “save” button.
- If the data has been correctly a you will receive a success.
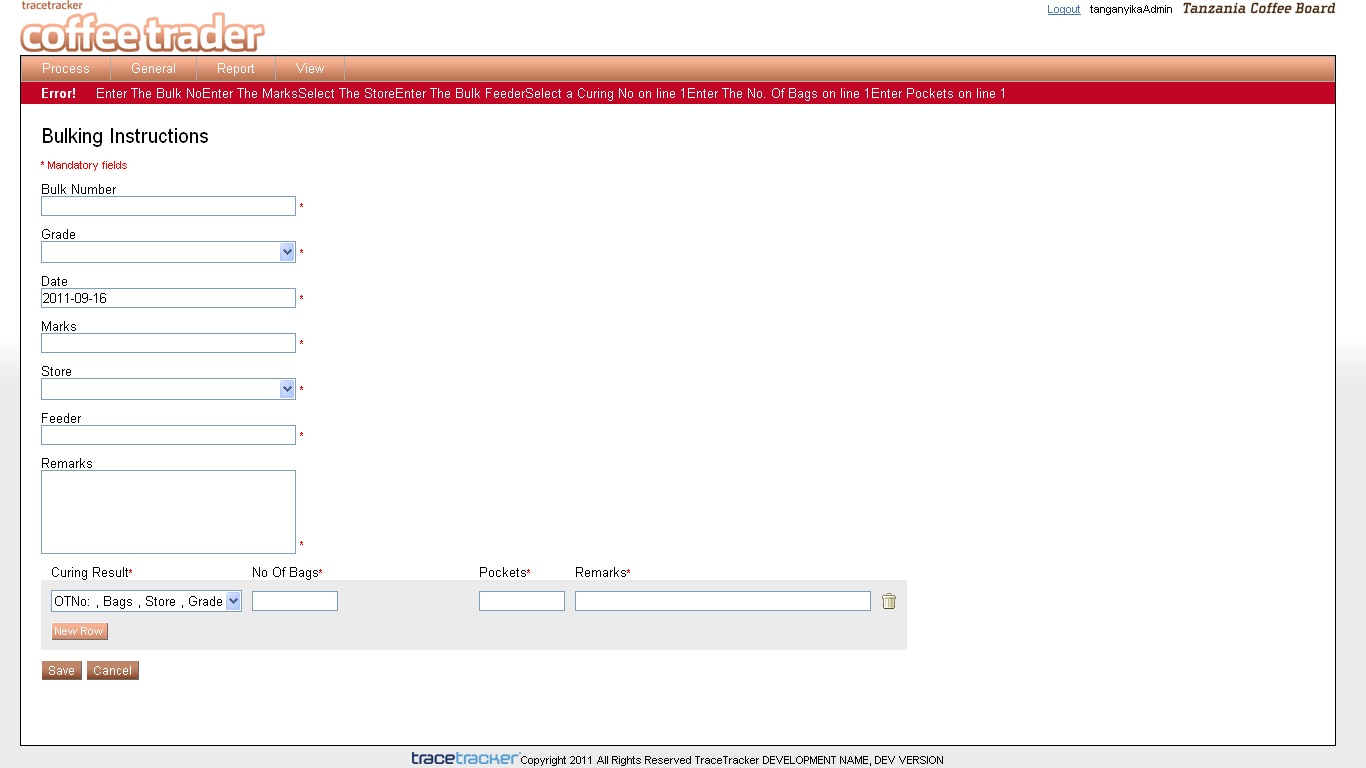
- If the data has been incorrectly entered you will get an error message as shown below.
Error message
Storage warranty
This is a document raised by the curing house that represents the bulked coffee ready for export or for auction sale. This document is sent to TCB for use at the auction or for coffee release incase of direct export. Once the coffee has got a Exporter after the auction process, it is filled with the Auction Sale No, Auction Sale Lot No and the Exporter. It is then used at TCB for generation of Coffee Release Note after the Exporter has paid for the coffee.
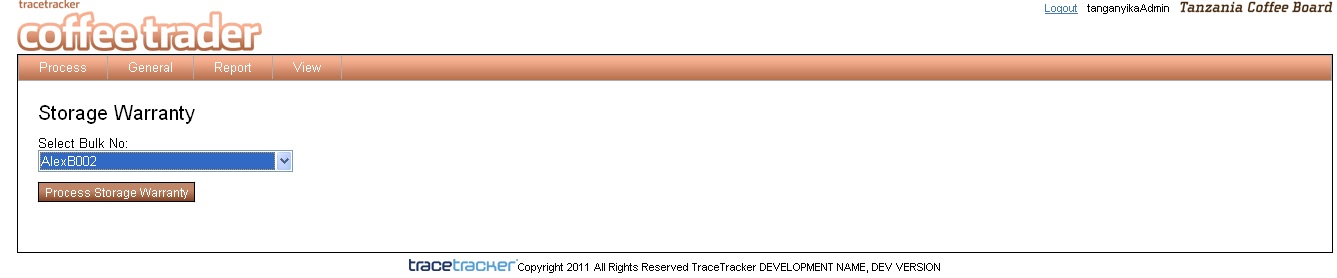
- On the Process menu click on “curing results”.
- Select the “Bulk No “From the drop down.
- When done click on the “Process Storage Warranty” button.
- The below screen is loaded
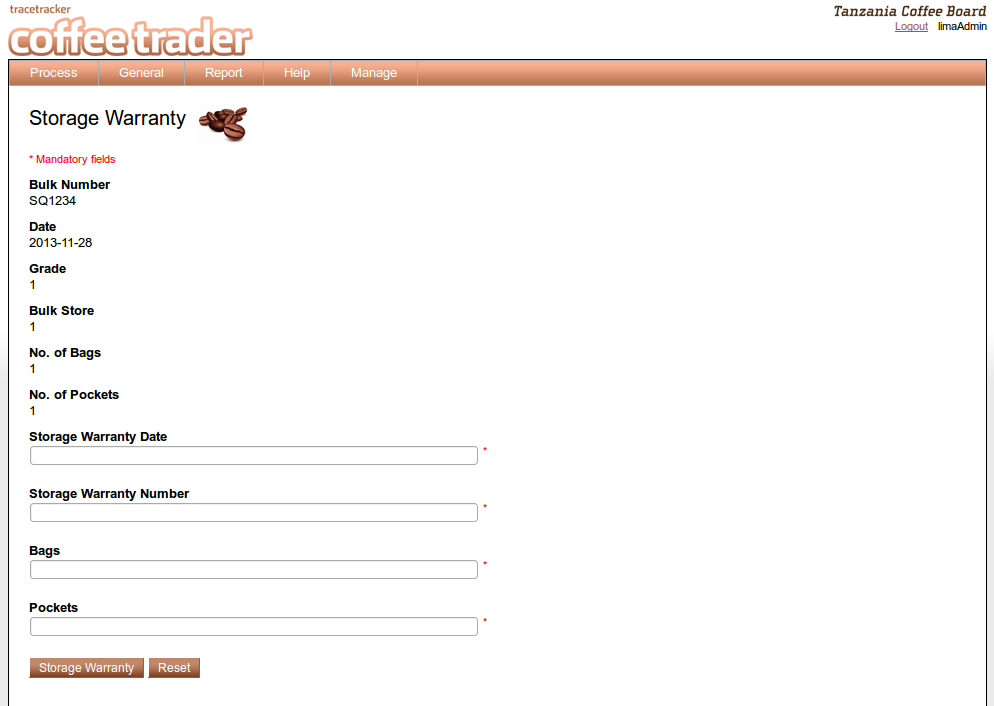
- Select the date by clicking inside the Date field. The default date displayed is of the current date .
- Enter the “Storage warranty number”
- Enter the “Remaining Bags”.
- Enter the “Remaining Packets”.
- When done click on the “storage Warranty button” button.
- Click on reset when you want to the “Reset” form.
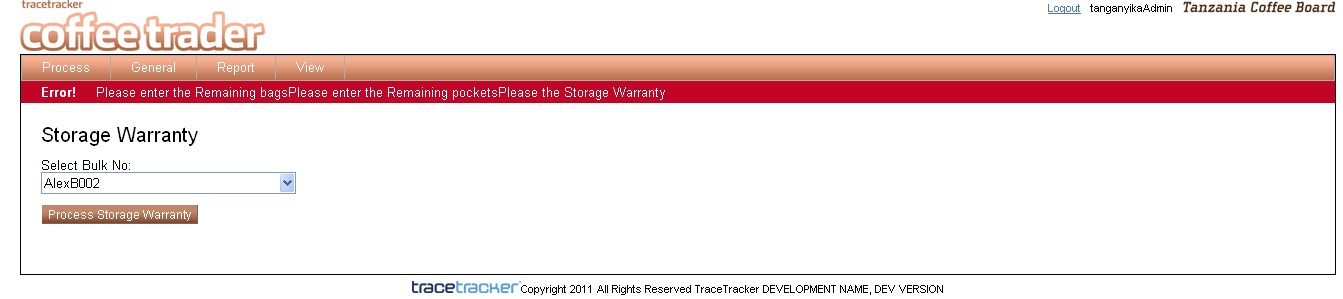
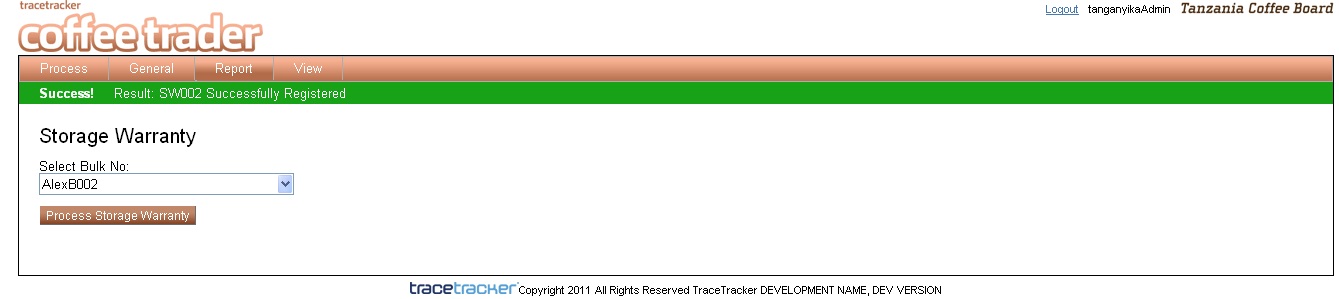
- If the data has been correctly or incorrectly entered you will get a message as shown below.
Validation on input.
- “Storage warranty Date” will accept only date format e.g. 2011-09-14
- “Storage warranty Number” will accept alphanumeric values.
- “Remaining bags” will accept only numeric values.
- “Remaining Pockets” will accept only numeric values.
If wrong input is entered an error message is loaded on the screen.
Error message
Success message
Coffee Disposal
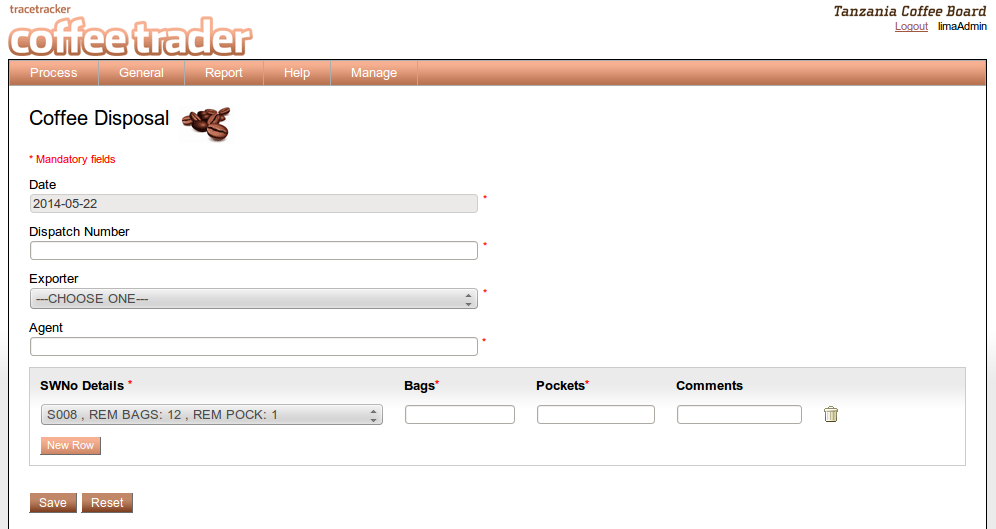
i. Select the date by clicking inside the Date field. The default date displayed is of the present day
ii. Enter the “Dispatch number”.
iii. Select the “Exporter”.
iv. Enter the “Agents Name”.
v. In the storage warranty details, select the storage warranty number; enter the number of pockets and comments.
vi. If you want to add more click on “new row”.
vii. When done click on the “save” button.
viii. Click on cancel when you want to the “clear” the form.
If the data has been wrongly entered you will get an error is loaded.
Validation on input.
a. “Date” will accept only date format values e.g. 2011-09-14.
b. “Dispatch Number” will accept numeric values.
c. “Agent” will accept text values.
d. “Pockets” will accept only numeric values.
e. “Bags” will accept only numeric values.
f. “Comments” will accept alphanumeric values.
If wrong input is entered an error message is loaded on the screen.
General

This section consists of standing data. This data does not change often eg change password, Add Store, add supervisor and add curing house user.
You can only define the data once in the system and the data will be available automatically during transactions.
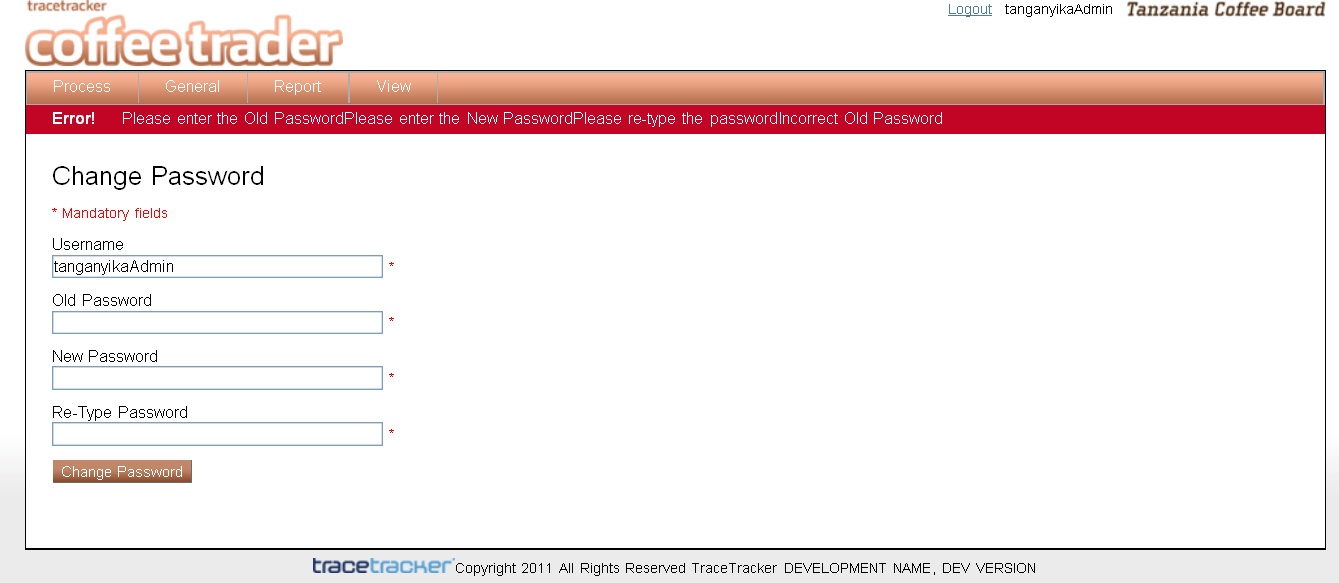
- Change Password
This form enables users to change their username and password.
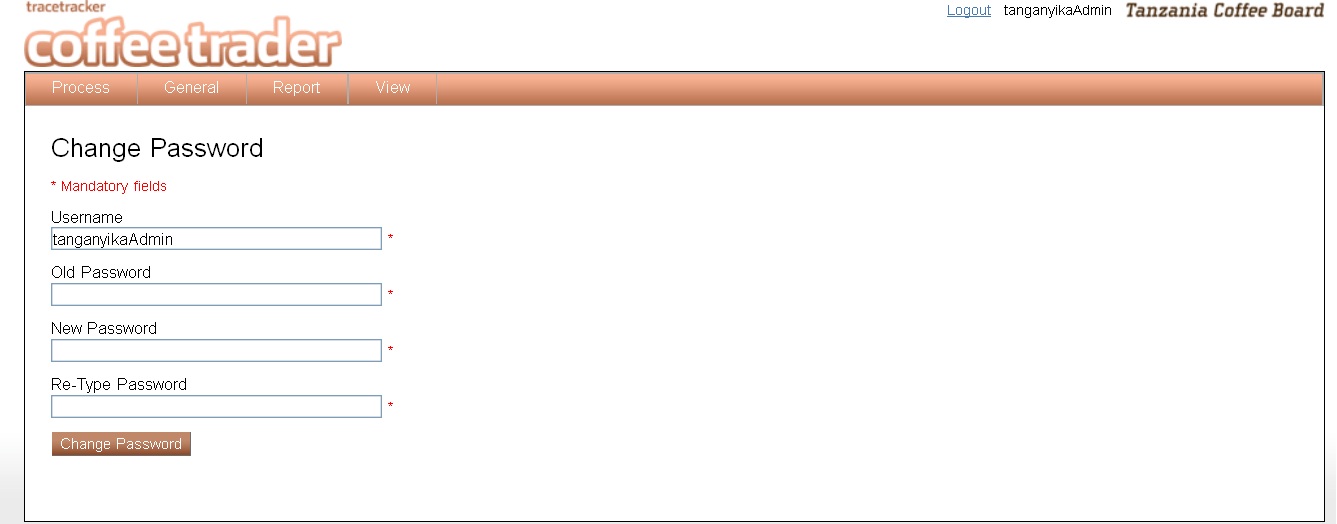
i. Change the username, if the “user” wishes to change the username.
ii. Enter the old password
iii. Enter the new password, it should be different from the old password
iv. Re-type the new password.
v. If the details aren’t entered correctly, an error message is displayed, as shown below
Validation on input.
a. “User name” will accept alphanumeric values.
b. “Password” will accept alphanumeric values.
If wrong input is entered an error message is loaded on the screen.
Error Message
2. Add Store
The add store form enables the curing house user to record the stores basic information as shown below.
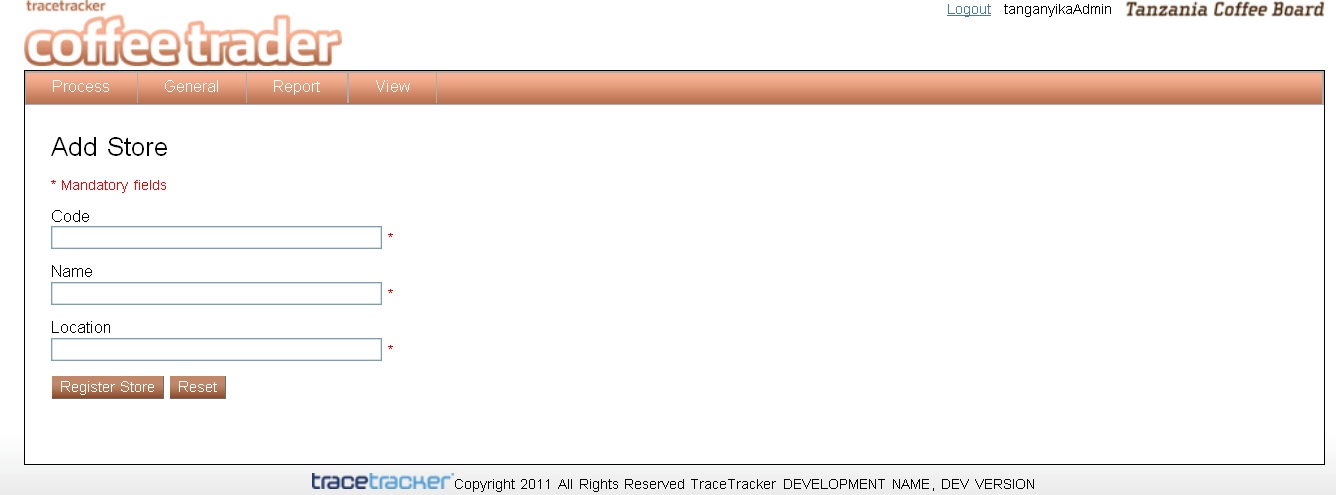
i. Enter the store “Code”.
ii. Enter the “Store Name”.
iii. Enter the “Store Location” – where the store is located.
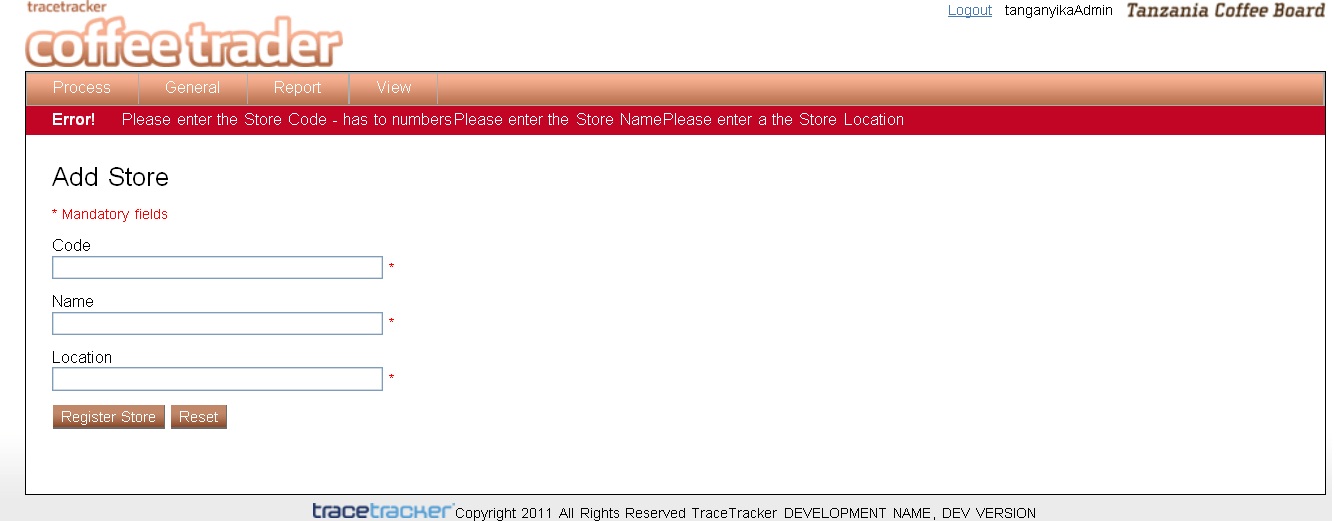
iv. If the details aren’t entered correctly, an error message is displayed, as shown below.
v. Click on reset when you want to the “clear” the form.
Validation on input.
a. “Store code” will accept only numeric values.
b. “Store Name” will accept alphanumeric values.
c. “Location” will accept alphanumeric values.
If wrong input is entered an error message is loaded on the screen.
Error message
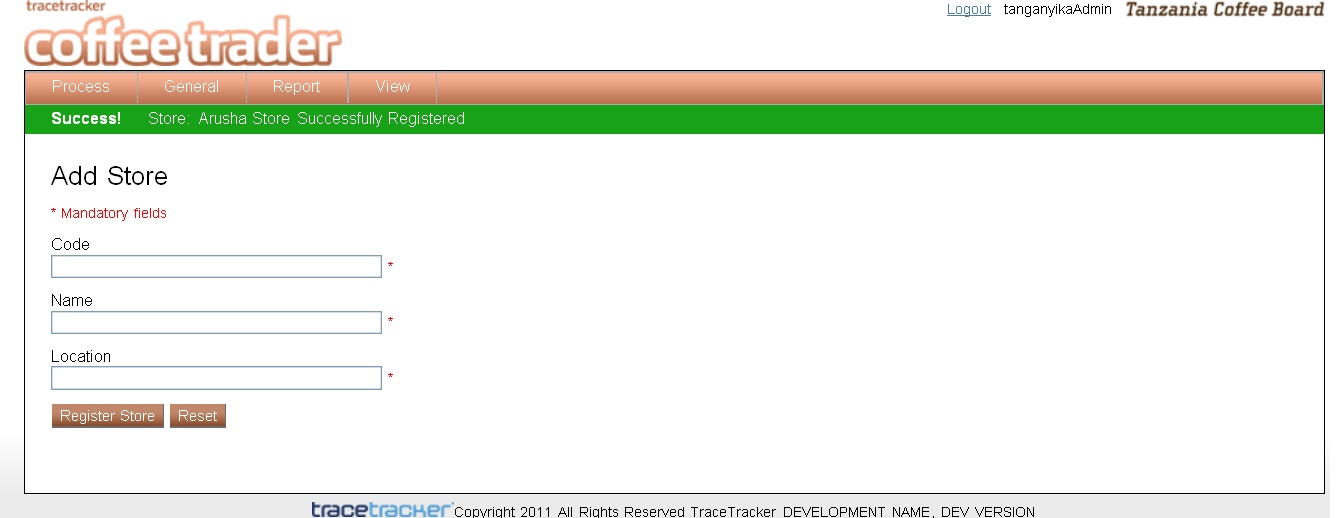
Success message
3. Add Supervisor
The add supervisor form enables the curing house user to record the supervisors basic information as shown below.
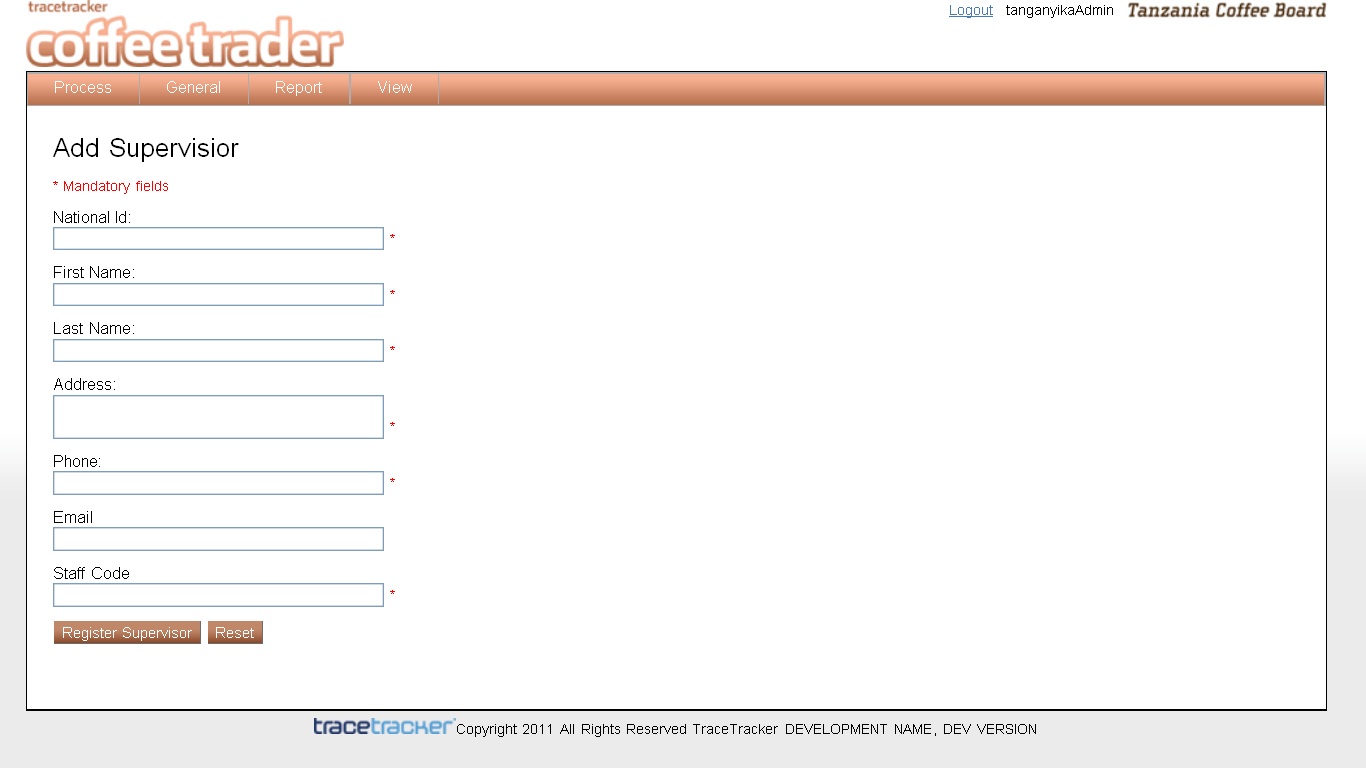
i. Enter the supervisors National Id.
ii. Enter the supervisors First Name.
iii. Enter the supervisors Last Name.
iv. Enter the address where, he/she is located.
v. Enter the phone number.
vi. Enter the staff code.
vii. When the details are all entered, click “Register Supervisor”.
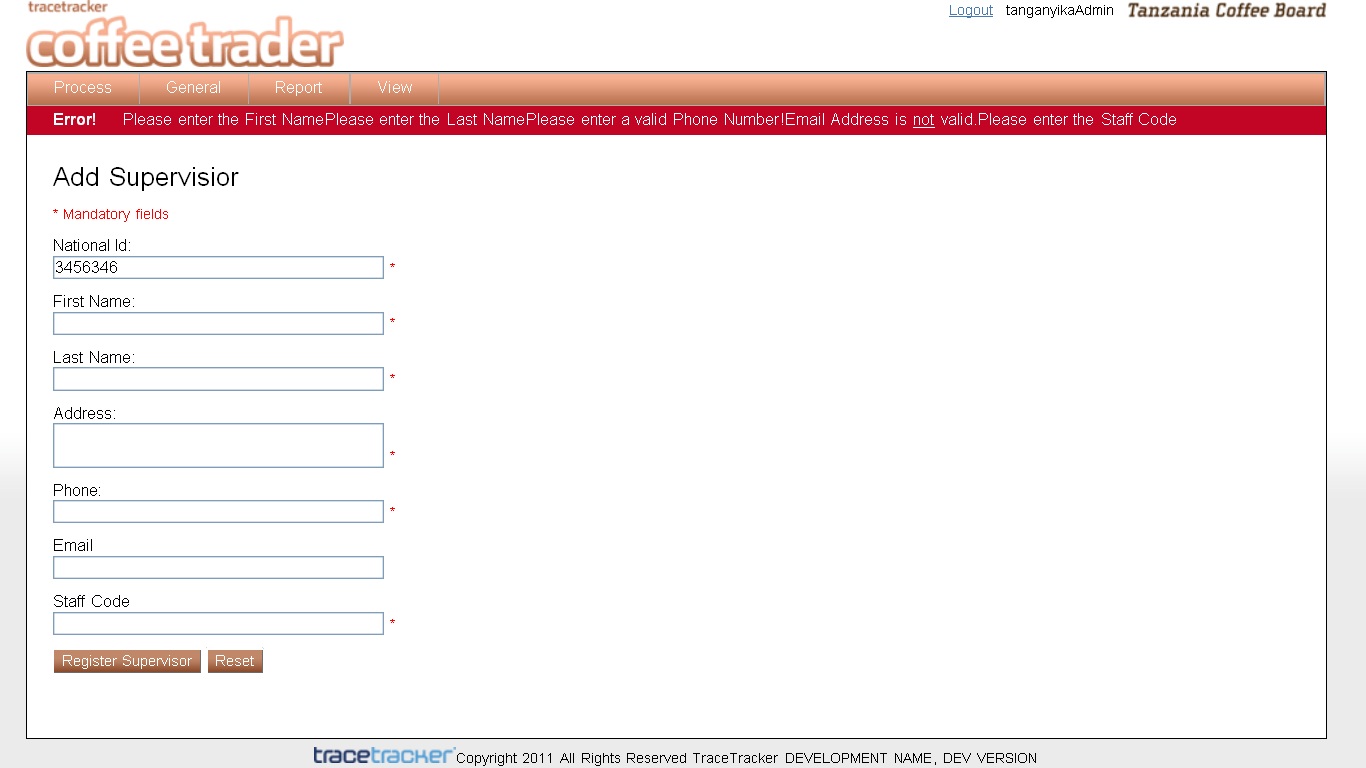
i. The “Reset” button clears everything from the page. If the details aren’t entered correctly, an error message is displayed, as shown below
Validation on input.
a. “National Id” will accept only numeric values.
b. “First Name” will accept only text values.
c. “Last Name” will accept only text values.
d. “Address” will only accept numeric values.
e. “Phone Number” will only accept numeric values.
f. “Email” will accept the email format e.g. wewe@arusha.com.
g. “Staff Code” will only accept numeric values.
If wrong input is entered an error message is loaded on the screen.
Error message
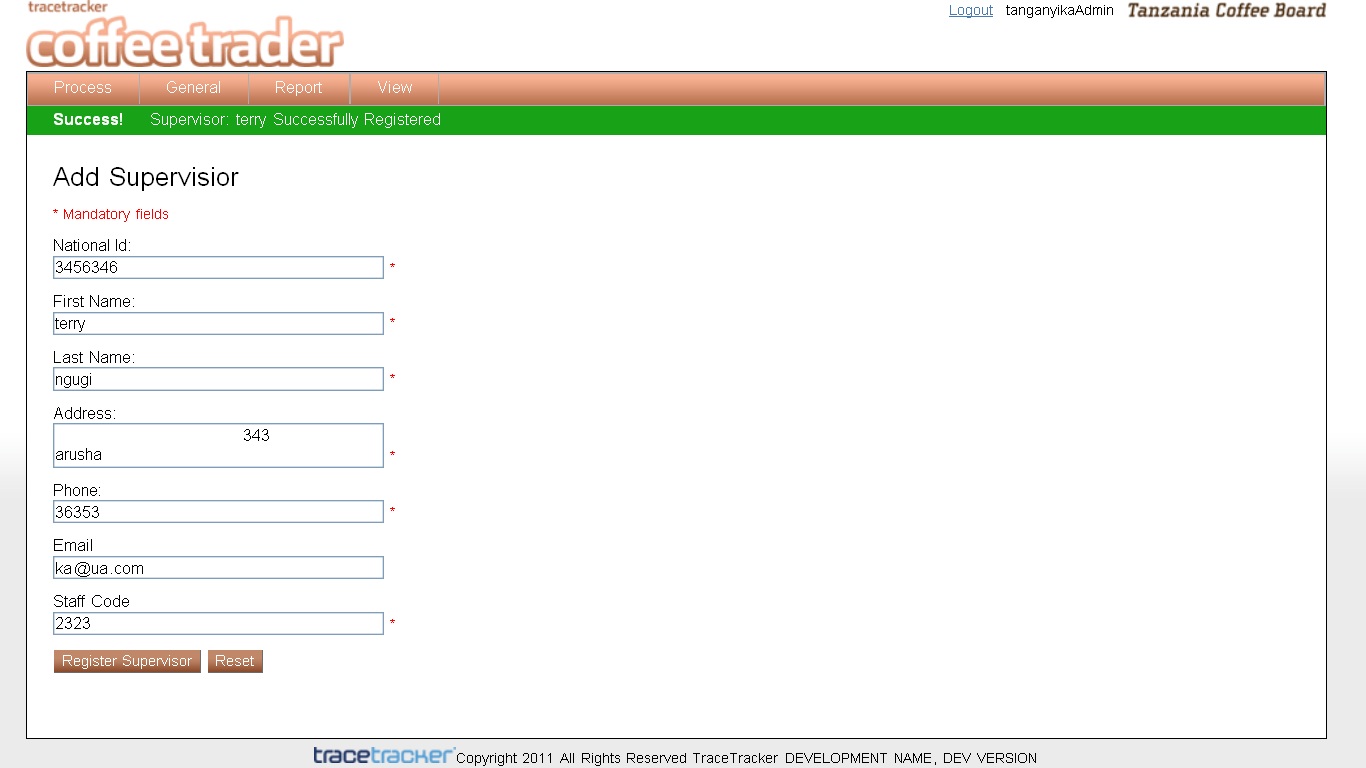
Success message
4. Add Curing house user
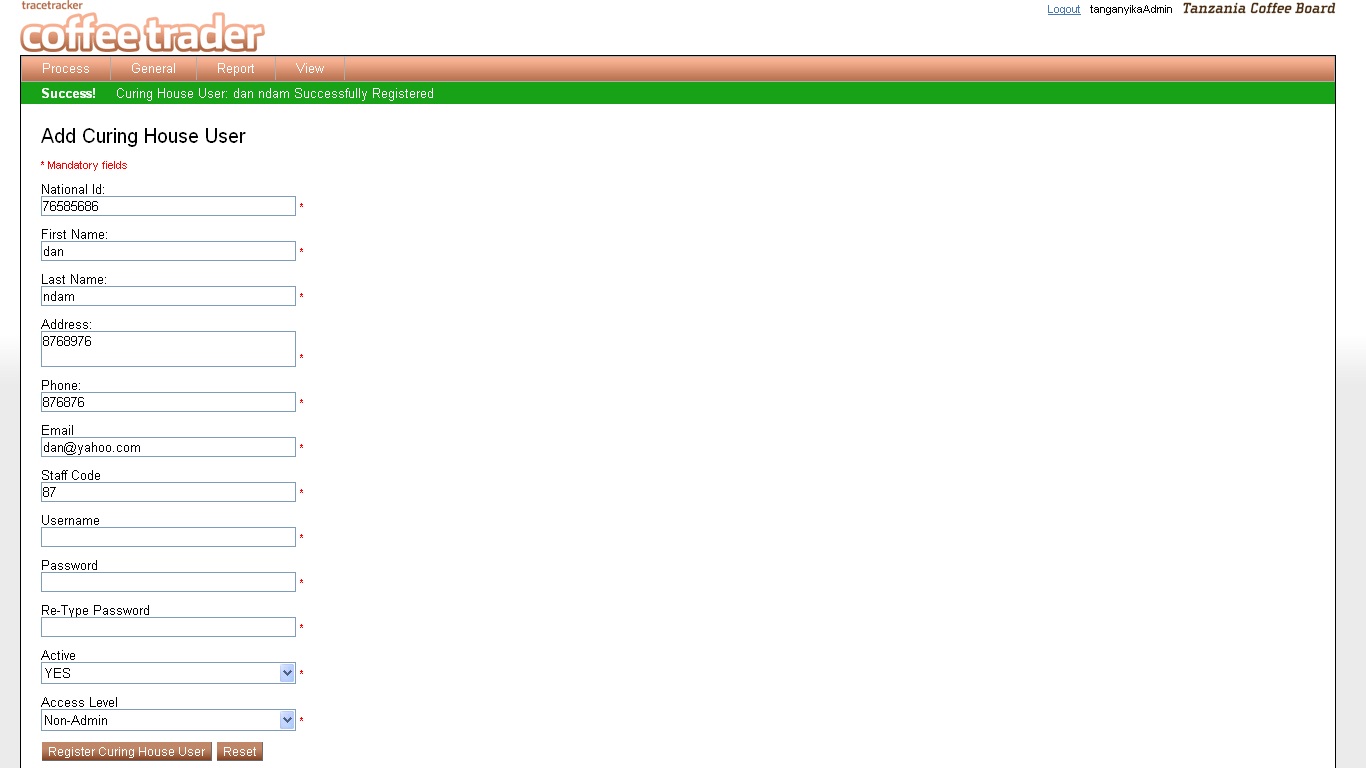
The curing house user registration form provides the curing house administrator with the opportunity to register new curing house user basic information as shown below.
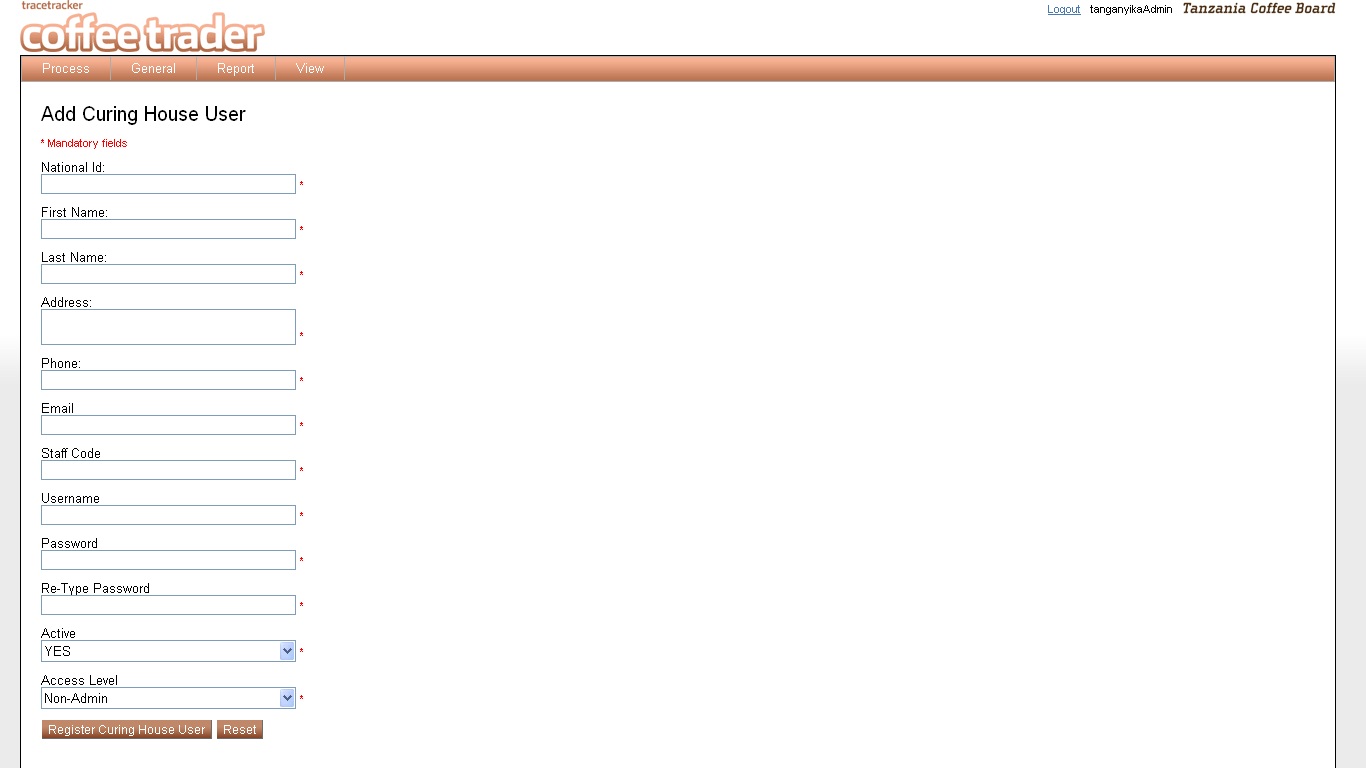
i. Enter the Curing house user “National Identification Number”.
ii. Enter the Curing house user “First Name”.
iii. Enter the Curing house user “Last Name”.
iv. Enter the “address” where, he/she is located.
v. Enter the “phone number”.
vi. Enter the “staff code”.
vii. Enter the “username” that the user will be using to log in into the system.
viii. Enter the “Password”.
ix. Re-type the “Password”
x. Select “active or not active”, if not active the curing house will not be able to log in into the system.
xi. Select the “access level” – if admin the user will be able to view all pages, non-admin the user will not be allowed to view some pages
xii. When the details are all entered, click “Register Curing house user”.
xiii. The “Reset” button clears everything from the page.
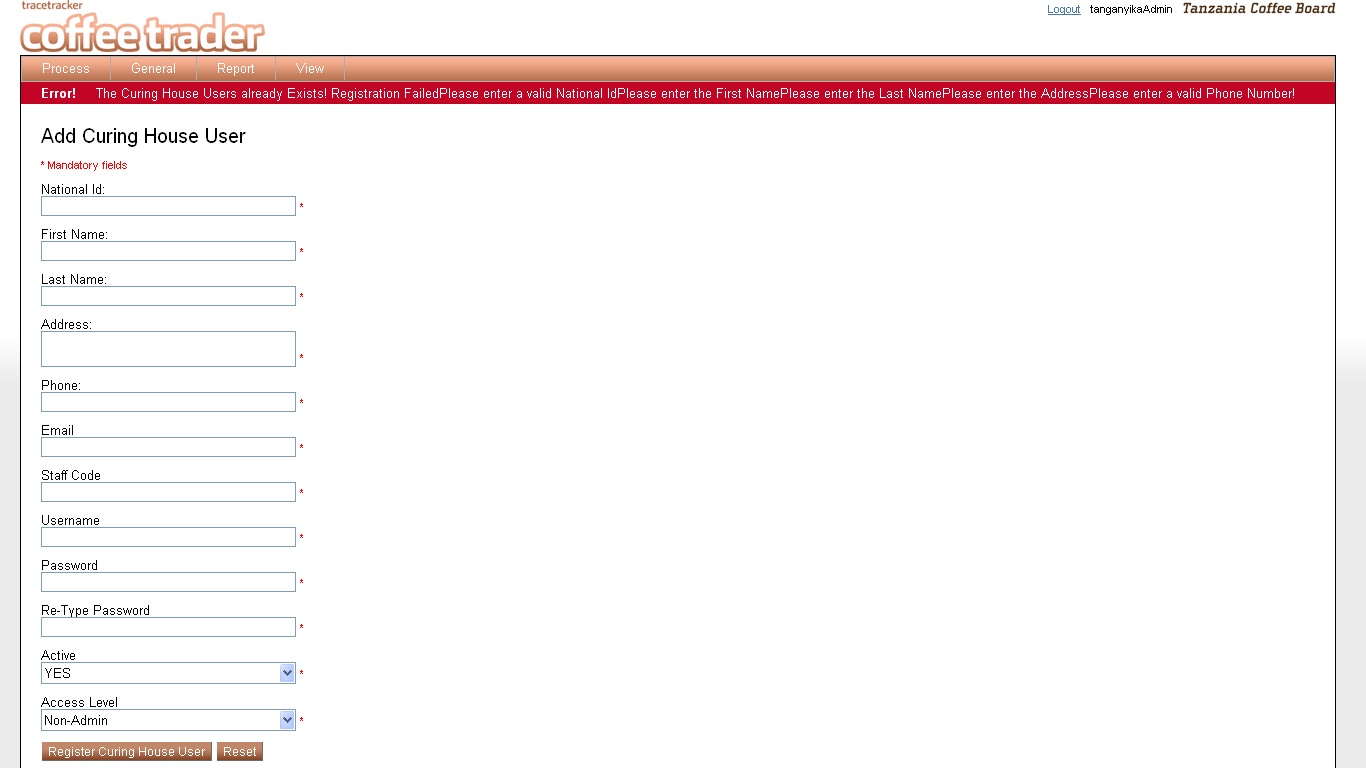
xiv. If the details aren’t entered correctly, an error message is displayed, as shown below
Validation on input.
a. “National Id” will accept only numeric values.
b. “First Name” will accept only text values.
c. “Last Name” will accept only text values.
d. “Address” will only accept numeric values.
e. “Phone Number” will only accept numeric values.
f. “Email” will accept the email format e.g. wewe@arusha.com.
g. “Staff Code” will only accept numeric values.
h. “User name” will accept alphanumeric values.
i. “Password” will accept alphanumeric values.
If wrong input is entered an error message is loaded on the screen.
Error Message
Success message
Coffee Disposal