
Scheduling A Report
Reports that are published/stored into the Solution Repository might be scheduled for execution. Scheduling a report results in the report being executed at specified intervals and the result can either be stored in the User Console or sent to specified users by email. The stored reports can be access by opening the Workspace inside the User Console.
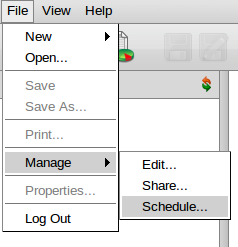
To schedule a report you can either do it by Schedule in the Menu bar and browse the Solution Repository for the report:
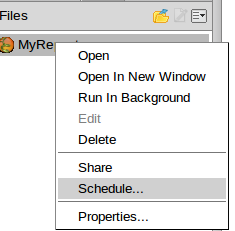
or you toggle on the Repository Browser, locate the report in the browser and right-click and select Schedule:
There are 2 types of schedules you can use to schedule a report: A User Defined Schedule or a Public Schedule. A User Defined Schedule is not recommended since you are not able to select report parameters, output type etc. The recommended way is to use a Public Schedule. Public Schedules are created by TraceTracker on request. After the Public Schedule is defined, TraceTracker also needs to configure that your report is allowed to use Public Schedules and which of the Public Schedules your report can use. If your report isn’t configured (by TraceTracker) to use Public Schedules, clicking on Schedule for your report will take the user to the User Defined Schedule dialog. If your report is configured for access to Public Schedule, clicking Schedule for your report will take you to a setup page like the one below.
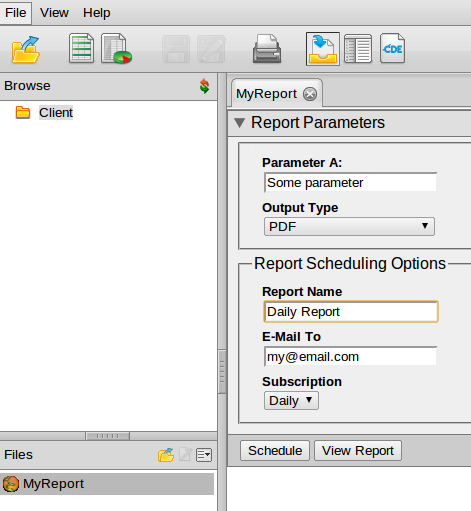
You type in the different Report parameters and Output Type. Then you enter a Report Name. This will be the name of the report when stored and subject and attachment name in email. Enter one or more email addresses into E-Mail To input if you want the report result sent to you. Use comma as separator if you add more than 1 address. The last thing you need to do is to select a Subscription. This is the Public Schedule to use. You can click View Report to have a look at the result or click Schedule to save the schedule setup.