
Publishing Reports
After having created your report, you will need to publish it to the TraceTracker BI Platform. When published, you can execute and schedule the report from the User Console. Publishing the report can be done from inside the Pentaho Report Designer. First save the report locally. It is recommended that you store your report somewhere safe, as your own backup! Then, from inside PRD, choose File=>Publish. This will open the following Publish dialog:
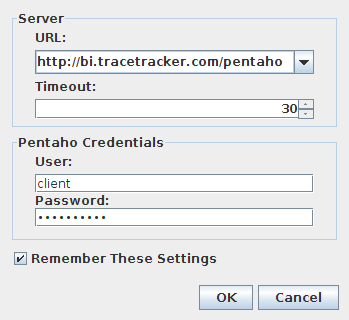
NOTE: The server address http://bi.tracetracker.com is only for example purposes!
The Server URL is the base url to the TraceTracker BI Platform. Timeout is a limit in seconds that will force the publish to fail if it takes more than this amount of seconds to publish the report. The User and Password is your User Console username/password (which will be provided to you by TraceTracker). Clicking OK will take you to the next dialog in the publish process:
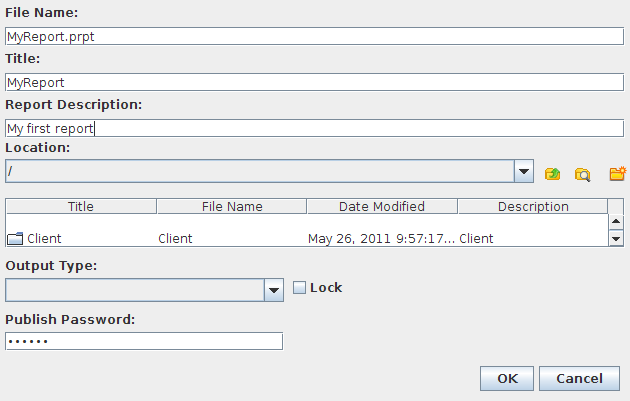
In this final step you submit a report Title and Report Description. Then you will select a Location for your report. You can also in this step create new folders and subfolders to better organize your repository content. Next you can choose to select a default Output Type (and lock the report to that Output Type. This will prevent users to execute the report with any other Output Type than the one you selected. NOTE: This kind of behaviour is also possible to configure in the report itself in PRD!). Finally, you need to enter the Publish Password. This will be provided to you by TraceTracker on request.
Editing reports
If you need to edit your report after publishing it, there are 2 ways:
- Open the report you stored locally, edit it, and publish it again.
- You can open the report directly from the Solution Repository by clicking File=>Open From Repository…, edit the file and publish it again.